Product Support
Get help with products
Stuck on how to use one of our products?
Not sure how to clean them?
Find all the useful support information right here.
Getting Started
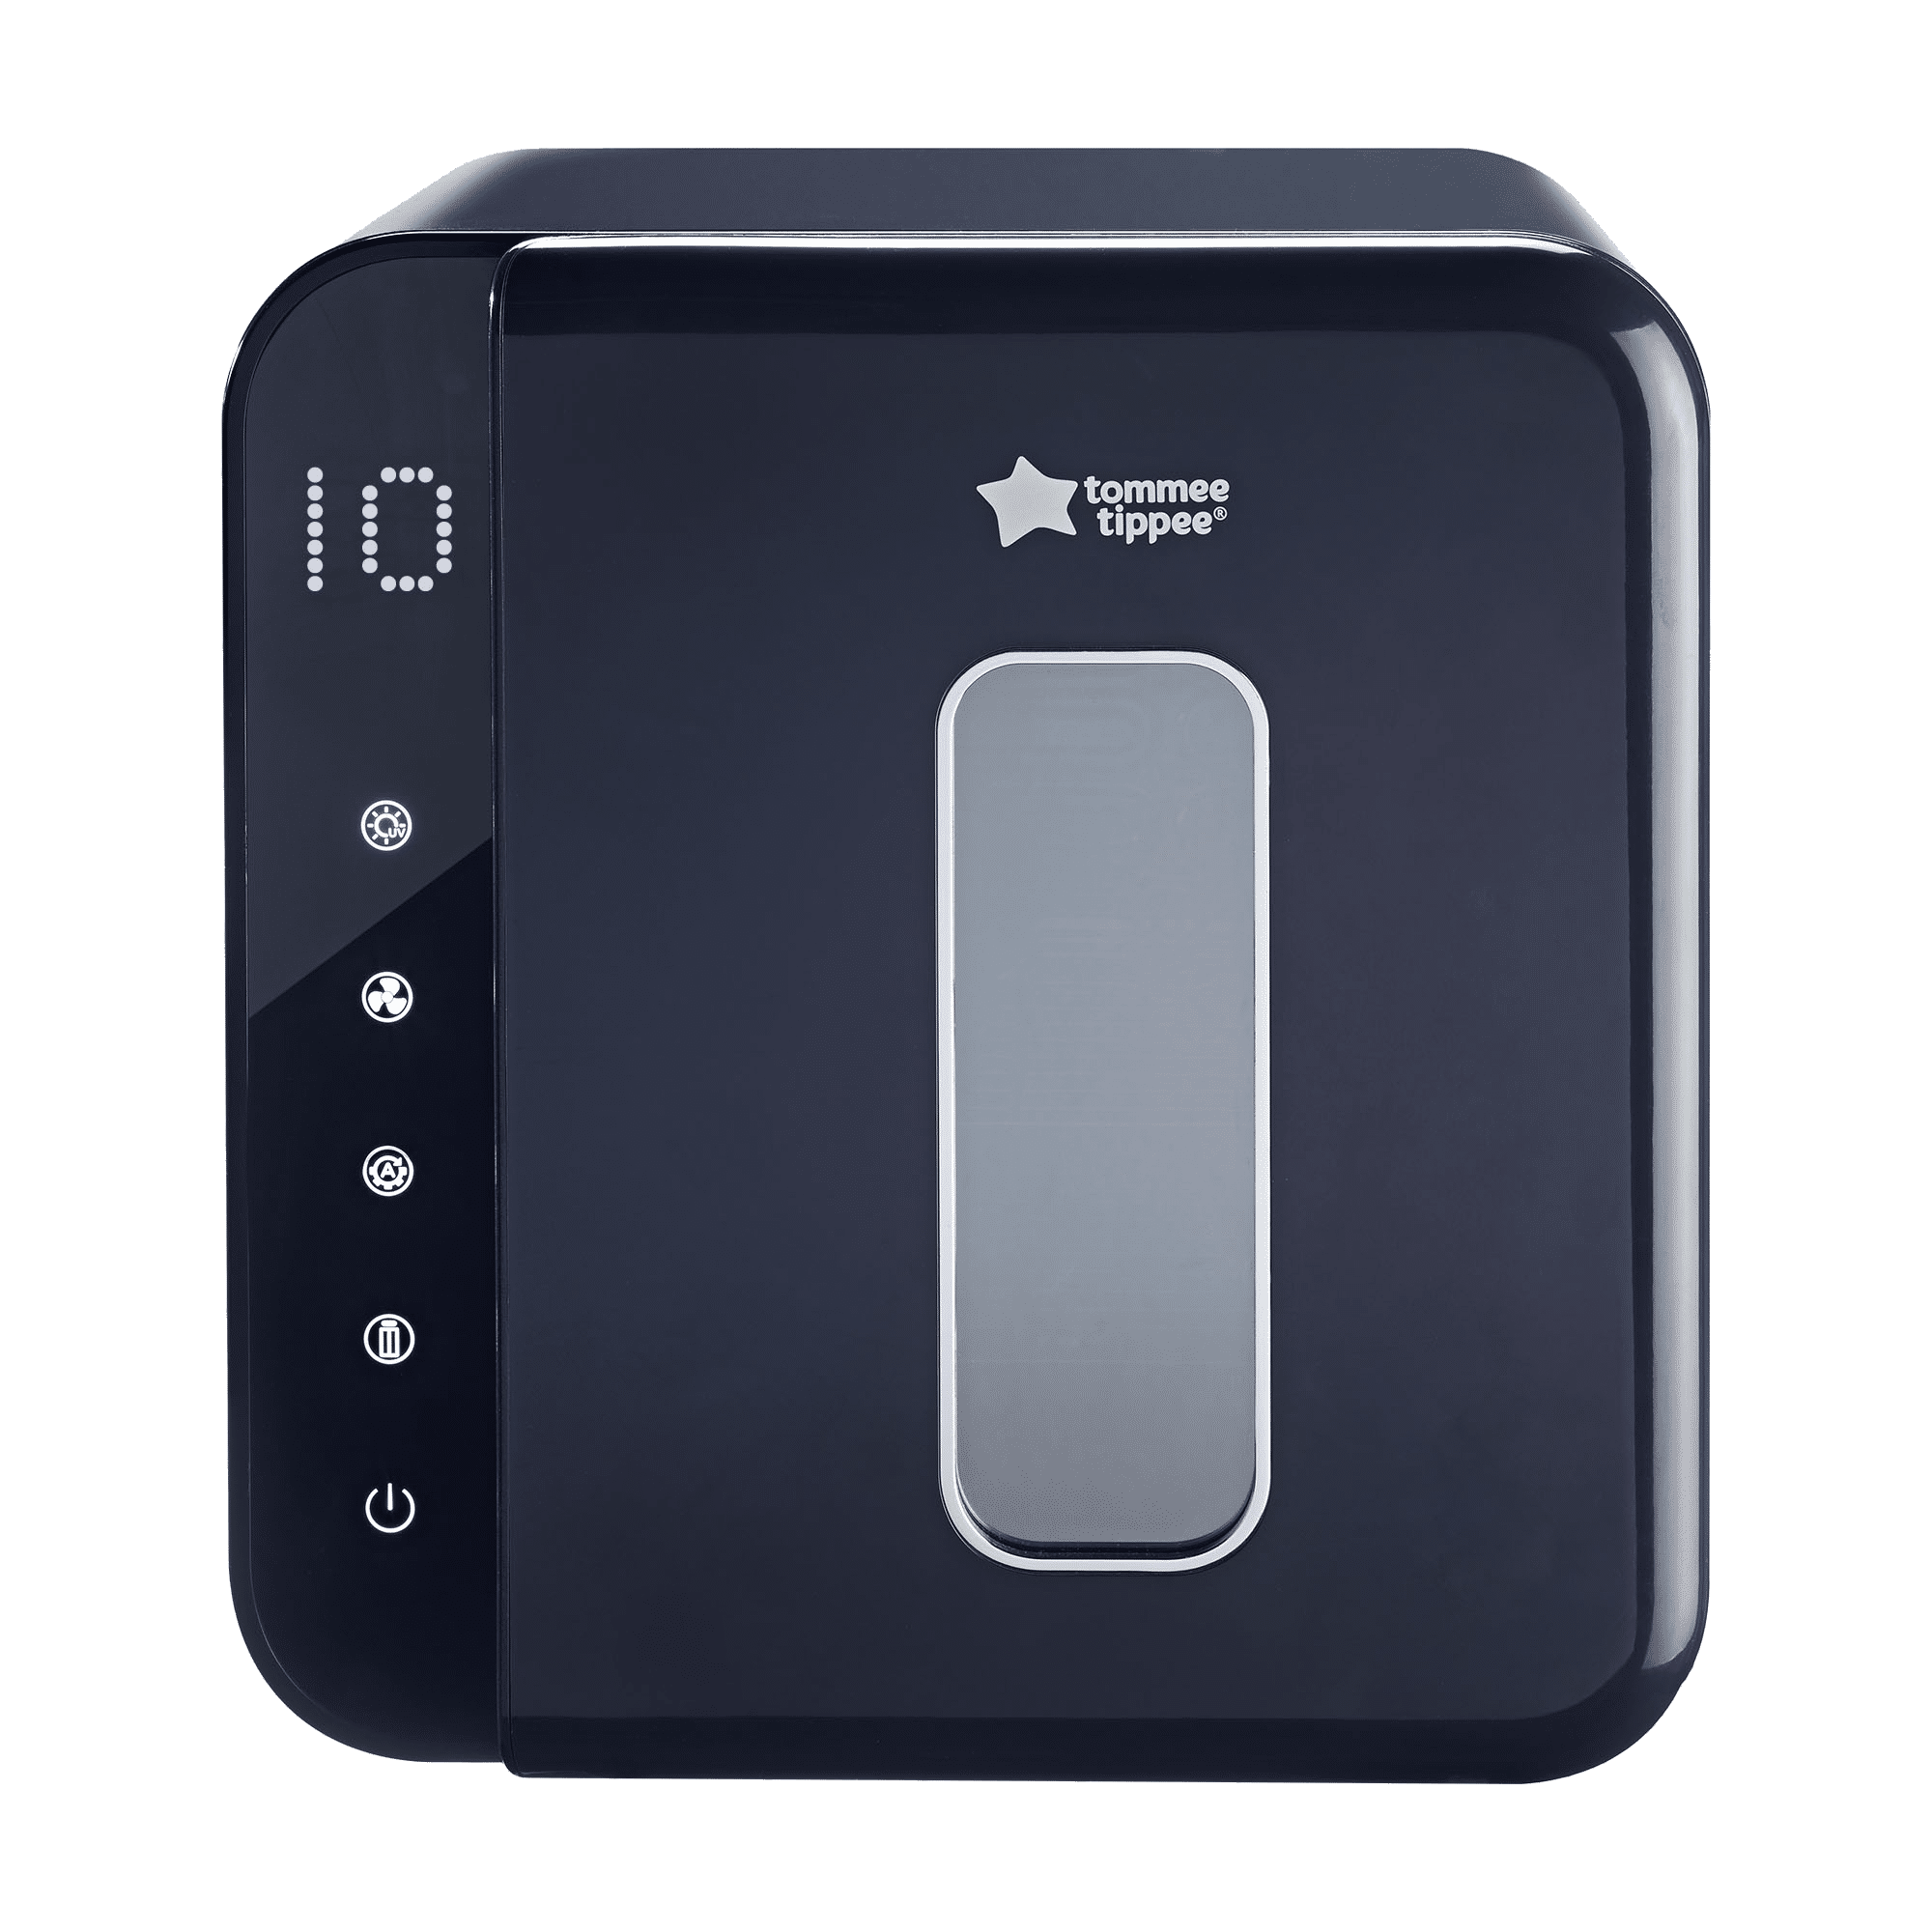
It’s great to see that you’ve purchased a Tommee Tippee Ultra UV 3-in-1 UV Steriliser, dryer and storage unit.
To help you get started and to keep it working effectively, we’ve added all the guidance you should need, plus some handy hint, tips and troubleshooting advice.
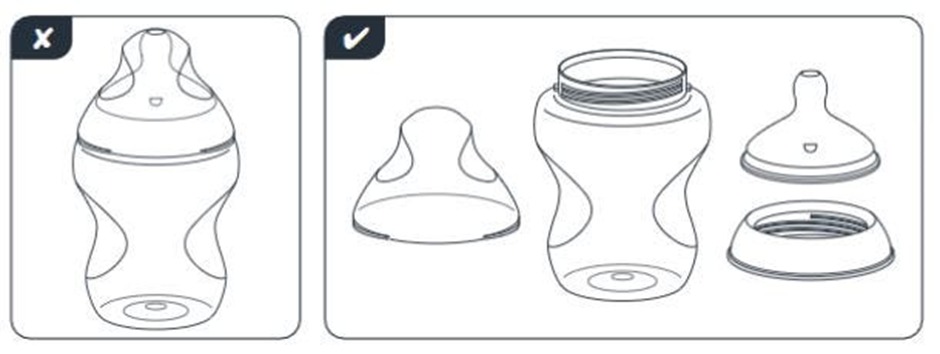
This steriliser is designed for use with Tommee Tippee bottles and feeding accessories (except the bottle brush) and holds a maximum of six Tommee Tippee bottles or a combination of fewer bottles plus soothers and breast pump parts.
Please remember…
- Always use the steriliser on a flat heat resistant surface and keep it away from inflammables and explosives.
- Place it at least 10cm away from a wall.
- Do not let the cord hang over the edge of kitchen work surface or touch hot surfaces.
- Do not move the steriliser when in use.
- Do not cover the steriliser and keep your hands, face and other body parts away whilst using.
Parts Guide
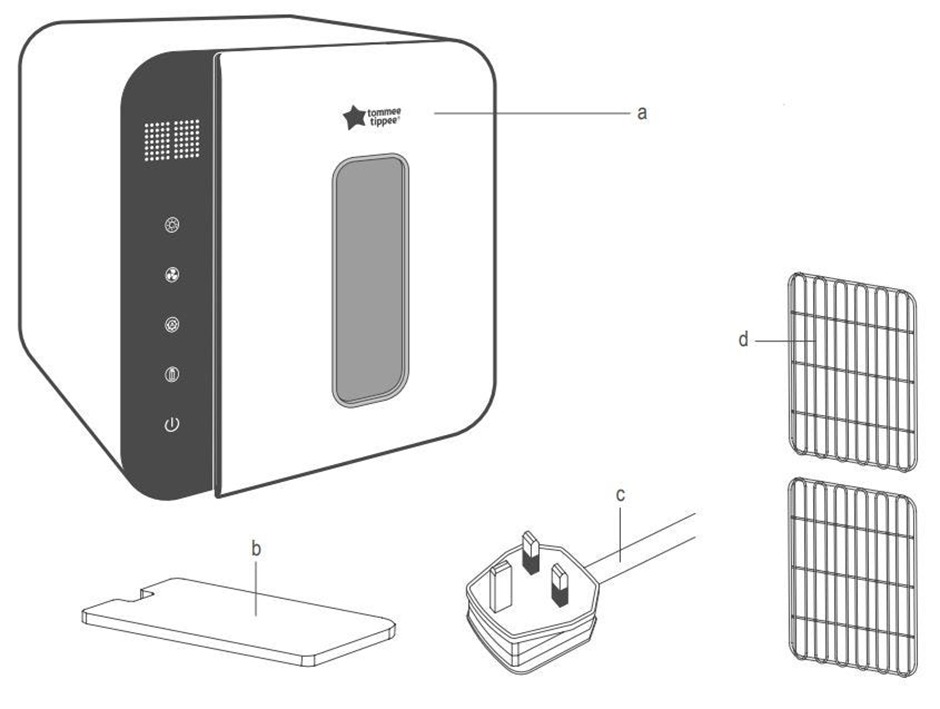
- Steriliser
- Filter screen
- Power cable
- Middle shelves
Setting up your Ultra UV 3-in-1 UV Steriliser for the first time
Please clean your steriliser before first use and don’t connect to the power at this stage.
- Remove all parts from the box.
- Open the steriliser door and remove the blue protective film, wipe clean the inside of the steriliser.
- Place the shelves inside.
- Wipe clean your steriliser before use with a damp cloth
- Finally, plug in the power cable.
How to Use
What can I sterilise in my Ultra UV 3-in-1 UV Steriliser?
We recommend that the following items are sterilised from birth…
- Bottles
- Teats
- Soothers
- Tableware
- Cutlery (non-metallic)
- Breast pumps (not the air tube or electric components)
- Teat tongs
- Storage lids
- Storage pots
- Nipple shields
How to use your Ultra UV 3-in-1 UV Steriliser
- Wash items you want to sterilise in warm soapy water, rinse and drain before placing in the steriliser. Don’t put dripping wet items into the steriliser, as water can gather at the base. If there is water at the base or leaking from the steriliser, please turn off the machine and wipe away water.
- Place the items inside the steriliser. Separate all components and ensure all surfaces that need to be sterilised are visible.
- Place bottles facing upwards to help with the drying function.
- Plug the unit into the power.
- The screen will illuminate.
- Press the on/off button then select the function you wish to use – sterilise only, dry only, auto sterilise and dry or storage function.
- The option chosen will then flash to show the function when in use. The countdown timer will show how long is left in the cycle.
- When the cycle is finished, the countdown will show 0 and emit a sound.
- Remove your items from the steriliser. Be careful as they may still be warm, especially after drying.
Please note…
- You may experience a faint odour on first use, this is normal.
- When in use, hot air is released from the steriliser. Please keep your hands, face and other body parts away.
- The steriliser uses UV light which can cause damage to your eyes and skin. Please don’t stare at the light source.
- Do not take items out of the steriliser during sterilisation.
- There may be some residual heat after use. Do not touch hot surfaces, such as the shelf, until these have cooled down.
- The UV lamp bulb will be hot after sterilisation. Do not touch.
- If you wish to leave the products inside the steriliser you can use the storage mode which will keep them sterile.
- Baby bottles that’ve been sterilised in the UV steriliser may become slightly yellowed in appearance. This is nothing to worry about. The bottles are still safe to use.
Ultra UV 3-in-1 UV Steriliser Functions

Sterilise Only
Press this button once for 35 minutes sterilisation and twice for 45 minutes sterilisation.

Dry Only
Press this button once for 30 minutes drying, twice for 40 minutes drying and three times for 50 minutes.

Auto Mode
Press this button to start a drying then sterilising cycle for 60 minutes in total, drying only first for 25 minutes then sterilising and drying for 35 minutes.

Storage
Press this button alongside any of the functions above to allow items to be stored in the steriliser. The steriliser will run a programme that emits five minutes of UV light and five minutes of drying every two hours, to ensure items inside remain sterile. You can open the door and remove one product, then press the storage button again to keep the remaining items inside sterile.

Power ON/OFF
Press this button to switch the steriliser on and off.
Ultra UV 3-in-1 UV Steriliser Troubleshooting
- Remember - if you open the door to the steriliser at any point during the cycle then the cycle will pause. If this happens during sterilisation its best to start that cycle again.
- To stop a function at any point, press the button that is in use until the lights are no longer illuminated.
- If the steriliser doesn’t work, allow it to cool for 5 minutes then try to restart.
- If any items block the outlet unplug the steriliser, allow it to cool for 5 minutes, then remove all items and try again.
How to Clean
You do not need to carry out any maintenance to this product other than cleaning, and descaling is not necessary.
We recommend that you clean your steriliser regularly, every 1-2 days to maintain its performance. To do so, follow these three simple steps…
- Turn off the power supply before cleaning and wait for your steriliser to cool down.
- Use a clean damp cloth to clean the inner and outer walls of the steriliser.
- Wipe away any dust on the screen with a clean damp cloth.
Remember…
- Make sure the steriliser is cool before cleaning.
- Do not put the steriliser into water.
- Do not use vinegar or other chemicals to clean as these can cause damage.
How to replace the filter screen on your Ultra UV 3-in-1 UV Steriliser
Change the filter regularly, you can replace using the spare filter sponge provided and reusing filters by rinsing with warm water and allowing to air dry.
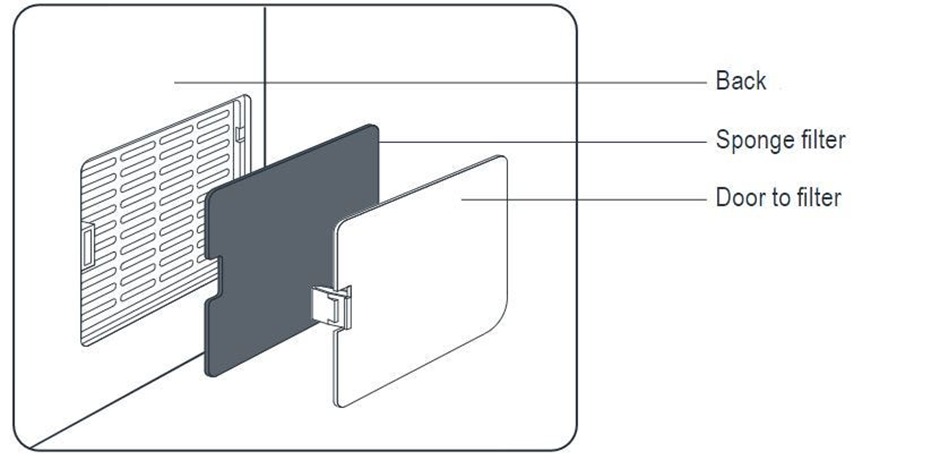
- Open the filter screen at the back of the unit
- Remove the old sponge filter
- If you wish to re-use the sponge filters, then rinse the sponge in warm water and leave to air dry.
- Alternatively take your new sponge filter out of the packaging or a sponge filter you have cleaned and place into the space. There is only one way the sponge can fit into the gap.
FAQs
Can I turn off the button sounds?

An alert sounds when you press any of the buttons and when you open or close the door. You can turn off the sound on the buttons but not when you open or close the door.
Why are all the lights on my unit staying on?
The lights on your unit light will remain illuminated even when in standby mode, this is nothing to worry about.
Why do I have to position my steriliser away from the wall?
We recommend a 4 inch gap to allow for ventilation, this protects your work surfaces and the unit.
If I leave my bottles in storage mode, how long will they remain sterile for?
In storage mode the steriliser will sterilise and dry the product every 2 hours, until the steriliser is switched off with the power off button.
How often should I rinse the sponge filter?
This very much depends on your environment. We would recommend that you wash or replace your sponge filter when you start to notice any dust build up on the sponge, make sure you check the sponge filter regularly.
I’ve lost/damaged my sponge filter – where can I get a replacement?
You get a spare sponge filter with the product; you can use this spare if you have lost or damaged the original sponge filter.
How long will the UV Light Bulb last?
Your Philips G4 TUV 4W T5 bulb will last 6,000 hours before it needs replacing.
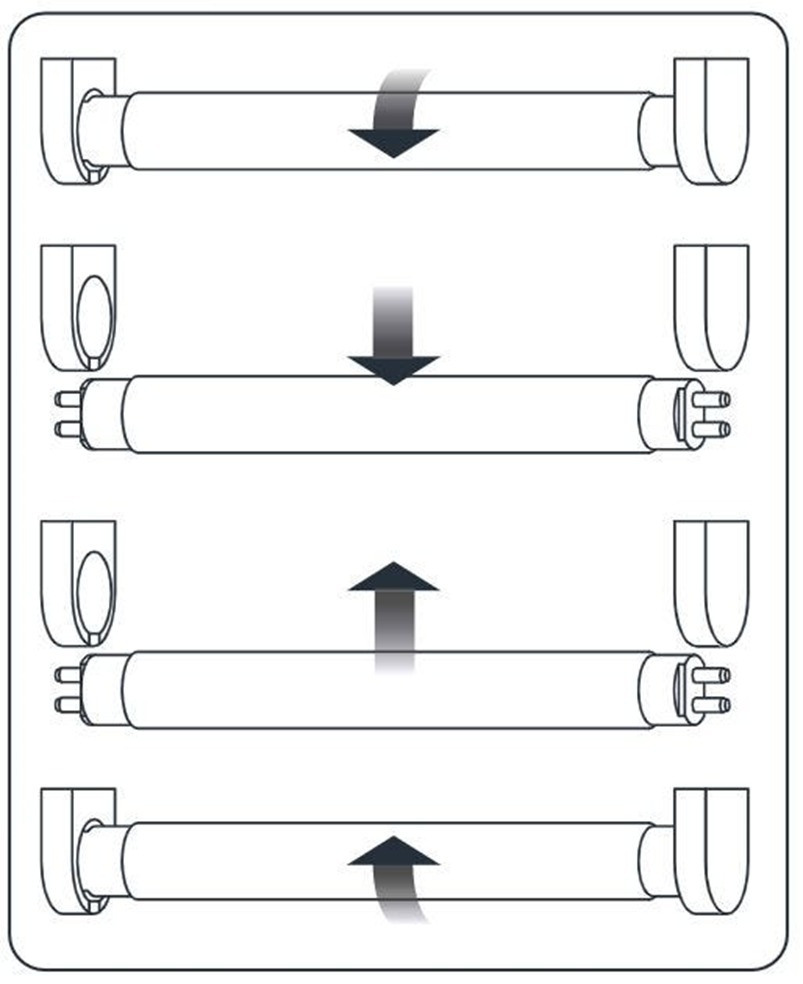
How to change the UV light bulb in your Ultra UV 3-in-1 UV Steriliser
First…
- Turn off the power and unplug the steriliser.
- Ensure the bulb is cool to touch.
- Ensure you are using a Philips G4 TUV 4W T5 Mini.
Then…
- Rotate the bulb 90 degrees anti clockwise.
- The socket should now be vertical, and you can remove the bulb by pulling it downwards.
- Take the new bulb and push it up into the vertical slots of the socket.
- Rotate the bulb 90 degrees clockwise.
- The socket will now be in the locked horizontal position.
Please note…
- UV bulbs contain the watermark which may be hazardous to the environment.
- Do not crush, break, or open the tube.
- Do not leave the UV bulb with the household garbage stacked together.
- If you have any recycling questions, please contact your local waste management office.
If you have any more questions or need some help using your Ultra UV 3-in-1 UV Steriliser, please don’t hesitate to contact us.