Product Support
Get help with products
Stuck on how to use one of our products?
Not sure how to clean them?
Find all the useful support information right here.

Getting Started
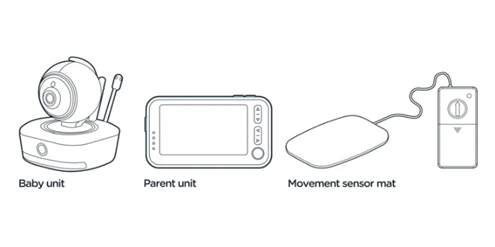
Great to see that you’ve purchased our Ultimate Dreamee Sleep & Nursery Baby Monitor System. To help you get started and to keep your product working effectively, we’ve added all the guidance you should need within this area, as well as some handy hints and tips and troubleshooting advice.
You may be wondering how your Dreamee monitor fits together and works. Don’t worry, it will soon become second nature.
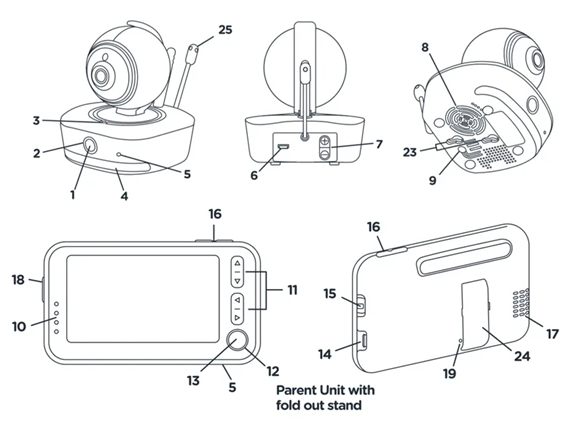
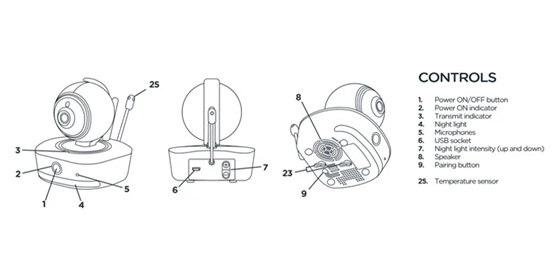
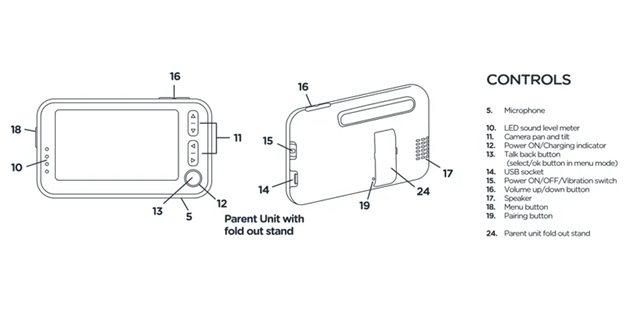
Parts guide:
- Power ON/OFF button
- Power ON indicator
- Transmit indicator
- Night light
- Microphone
- USB socket
- Night light intensity (up and down)
- Speaker
- Pairing button
- LED sound level meter
- Camera pan and tilt
- Power ON/Charging indicator
- Talk back button (select/ok button in menu mode)
- USB socket
- Power ON/OFF/Vibration switch
- Volume up/down button
- Speaker
- Menu button
- Pairing button
- Movement indicator
- Movement sensitivity adjustment knob
- Alarm hold button
- Wall mounting holes
- Parent unit fold out stand
- Temperature sensor
Getting Set up:
This Tommee Tippee dreamee sleep and nursery monitor gives you peace of mind by allowing you to keep a close eye and ear on sleeping baby without disturbing their rest.
1. Plug the cable into the Parent unit, then plug it into the mains power socket and switch the socket on.
2. Leave to charge for 4 hours or until the red light indicator turns o_.
Note: The battery life of the movement sensor mat lasts up to 90 days.
3. Place the Baby unit near a power socket in the room where you’re going to be monitoring your baby most of the time. It should be at least one metre away from your baby.
4. Plug the cable into the Baby unit, then plug it into the mains power socket and switch the socket on.
5. Keep the Parent unit at least 3ft/0.9m metre away from the Baby unit to avoid audio feedback.
6. Once the Parent unit has charged, turn it and the Baby unit on and you’re ready to start monitoring.
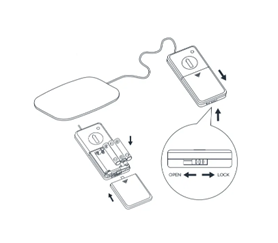
7. To prepare the Movement sensor mat, set the lock lever to open, slide open the battery door in direction as shown. Install 3 AA (UM-3) alkaline batteries in the correct orientation. Slide the battery cover back on and set the lever to lock.
Note: The first time you use the unit or if you haven’t used it for a long time, it may take longer to charge.
How to Use
How to use the Baby Unit (Camera)
CAMERA
- Place the camera onto a stable surface or mounted on the wall at least 3ft/0.9m away from baby.
- Press and hold the power button (1) to turn on.
- Adjust the microphone sensitivity to your desirable sound level.
- The camera will only transmit when baby makes a noise.
- Once the camera starts to transmit, the transmit indicator (3) will light up blue. When baby is silent, the microphone (5) will not pick up any sound, the camera will stop transmitting and go into standby mode.
- The night light can be set to ON, OFF or VOX (when detecting sound) using the Parent Unit.
- The light intensity can be adjusted using +/- buttons (7).
How to use the parent unit
PARENT UNIT
- Switch on by setting the power switch (15) to either I (on) or (vibrate) mode.
- At the same time, the power on indicator (12) will show a steady green.
- Note: If this indicator starts flashing green, the Li batteries have run down and need to be recharged using the supplied 5V AC adapter.
- The image captured by the camera should be shown on screen while the sound picked up by microphone should be heard from speaker. If the screen shows “No signal or Out of Range”, it means the units are not properly paired.
- Please ensure both the camera unit and parent unit are turned on. Follow steps in 'Pairing' section if you need to pair.
- To achieve a better reception and longer communication range, rotate the antenna to a vertical position.
EASE OF USE
- For easy viewing, place the Parent unit on a flat surface by pulling out the stand on the back. To achieve a better reception and longer communication range, rotate the antenna to a vertical position
NIGHT VISION
- When there is sufficient light in the room, the screen will show a colourful image. When the room gets dark, the IR LED camera will automatically turn on to illuminate the surroundings and the screen will show a black and white image.
MOVEMENT TRACKING
- When baby becomes a toddler, you can activate the movement tracking function in the Parent unit and the camera lens will automatically track the movement of your toddler.
Note: If there are several moving objects within the view as captured by camera lens, this tracking function may not operate accurately.
How to change the volume
- Adjust the volume of the speaker using the +/- buttons on the top of the parent Parent unit. The volume will show on the screen.
- If you prefer to have no sound, press the volume down button until you see the icon and the sound will be muted.
- Press volume up to resume sound.
How to move the camera using the Parent unit
- To pan and tilt your camera use the buttons. Only press one button at a time.
How to talk to your baby using the Parent unit
You can talk to your baby at any time using the talk back function:
- Press and hold the talk back button, will show up on screen.
- Speak towards the microphone.
- Your voice will be heard from the speaker at the base of the camera.
- Adjust the volume of speaker using the Settings menu.
- Release the talk back button to listen to your baby.
HOW TO USE THE MOVEMENT SENSOR MAT
- Place the movement sensor mat underneath the mattress, in a lengthwise direction directly under where your baby sleeps. For optimum performance, there should be no bed clothes tucked between the sensor mat and the mattress. If the mattress support is too soft, place a hard board underneath the mat to provide a firm surface for it. The size of the board should be larger than the sensor mat.
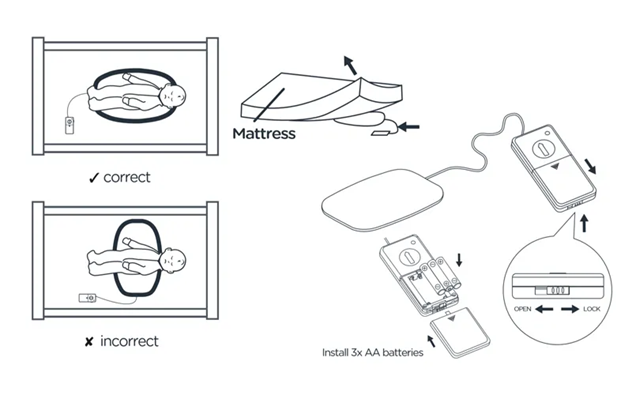
- With your baby placed in the cot, switch on the movement sensor mat by turning the
movement sensitivity knob in a clockwise direction. Adjust the position of knob until the movement indicator blinks at the same pace as your baby’s movement. - Slip the control box underneath the mattress and keep out of reach of baby, placing it as far away from the movement sensor mat as possible.
- You may need to adjust the sensitivity as baby grows and gains weight. Note: Before attempting to adjust the sensitivity knob, wait for at least 15-20 min until your baby has settled down or fallen asleep.
- Ensure the Camera and movement sensor mat are in the same room, less than 10 metres apart, or you may be unable to detect movement.
- If the movement sensor mat does not detect any activity from baby for over 20 seconds, the Parent unit will sound an audible alarm to alert you and the screen will show the message 'No movement detected'.
- In order to avoid false alarms when removing baby from cot for feeding or comforting, press the alarm hold button (22) within 20 seconds of removing baby, or just before if you prefer.
- To stop the alarm, press the hold button.
- Upon placing your baby back into their crib, the movement sensor mat will automatically resume monitoring baby’s movement after 20 seconds.
Note: To activate your movement sensor mat, set the movement monitoring function to ON in the menu. - After 20 seconds the Parent unit should sound an alarm to show it is not picking up any movement. Slightly tap the mat and the alarm will stop - this will confirm the system is working properly. Change the setting back to OFF until you are ready to use the pad.
HOW TO PAIR YOUR PARENT UNIT WITH YOUR CAMERA AND MOVEMENT SENSOR MAT
Note: The parent unit and camera are already paired when purchased, however this may be required to be re-paired if an additional monitor is purchased (cameras are not sold separately).
Only pair the camera with the movement sensor pad after pairing between the parent unit and the camera(s) is complete, otherwise the system will not operate properly. Ensure movement sensor mat has batteries inserted.
- To pair, press and hold the pairing button on the base of the camera while switching on the camera unit (a long press of the power button) until the transmit indicator starts flashing.
- Now press and hold the alarm button on the side of the sensitivity control box while switching on the movement sensor pad by turning the dial towards high.
- Wait for the movement indicator to start flashing. You’ll hear two beeps from the camera, indicating pairing has been successful.
- Switch on both the camera and movement sensor pad and switch them on again for normal operation. The sensor pad is now ready for use.
Viewing and changing settings from the Parent unit
In the settings menu on the Parent unit you will see 5 icons displayed at the top of the screen.
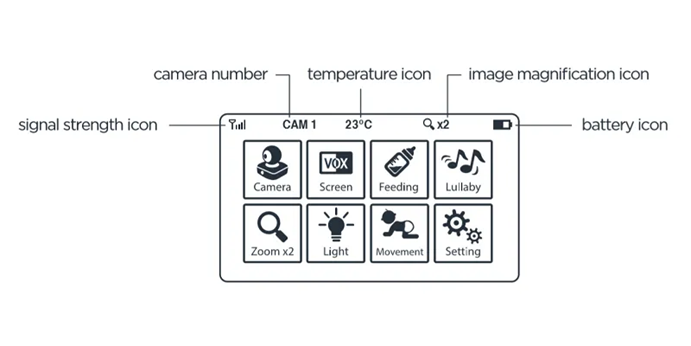
Signal strength
When the signal strength icon shows full 4 bars, you should be able to see a clear colour image of your baby on screen, provided the Parent unit and Baby unit are paired and within operating range.
As the distance between the camera and Parent unit increases, the signal strength will lessen and the image will be less clear until it goes out of range. At this point the screen will revert to a still image and ‘No signal or out of range’ will be displayed on the screen at regular intervals. The visual level meter will also flash and an audio alarm will sound.
Once the Parent unit is back within operating range the audio alarm will stop and the visual level meter will stop flashing.
Camera number
This shows which camera is being displayed on the Parent unit.
Temperature icon
This shows the current temperature of baby’s room.
- If the temperature of baby’s room is higher or lower than the limits that you preset an audio alarm will sound and the screen will display:
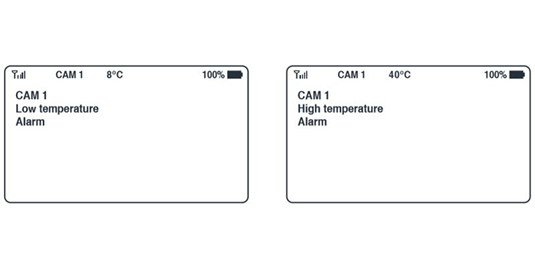
Image magnification icon
Will be displayed when you select the x2 zoom option on the Parent unit.
Battery icon
This shows the battery level in your Parent unit. Once it drops below 20% this icon will flash and an audio alarm will sound to alert you to charge the battery.
When charging, the battery icon will flash and the power on indicator will stay red until the battery is fully charged, when it will turn green.
Visual meter
Whenever your baby makes a sound that activates the camera in the Baby unit, the visual level meter will light up.
The louder the sound, the more levels will light up. This is useful if you want to turn the speaker volume down to keep the environment quiet while still monitoring baby’s activity.
How to use the different settings
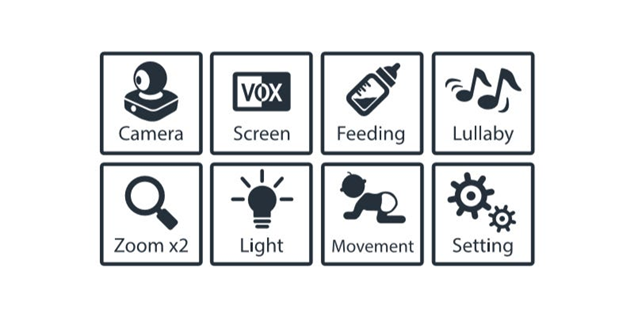
- To access the settings menu, press the button on the left-hand side of the Parent unit, navigate sing the arrows and press select/ok to action or exit.
- Use when you have more than one camera linked to the Parent unit. You can select the camera you wish to view.
- Magnify the screen by x1 or x2. The desired magnification will show up on the screen.
- Choose between “VOX On” or “Screen On” mode. The screen will only come on when detecting noise from your baby when in VOX mode. It will shut down automatically after a delay of 5 - 25 seconds (as selected by you) once your baby stops making a sound.
- Turn the camera light to “On”, “O_” or “VOX”. In VOX mode, the night light will be on once the camera detects baby’s cry and go off when the room becomes silent.
- Set a reminder for feeding with a countdown on the Parent unit screen.
- Automatically track your baby’s movements by turning on. Note: If there are several moving objects within the view as captured by camera lens, this tracking function may not operate accurately.
- Play up to 6 lullaby/nature sounds. lullaby function which be remotely turned on or off using the Parent unit.
- Customise how things like temperature, alarm, key tone, camera, microphone sensitivity, volume, night vision and the movements sensor pad are displayed and operated.
Troubleshooting
